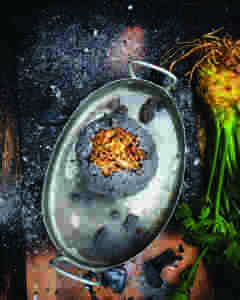
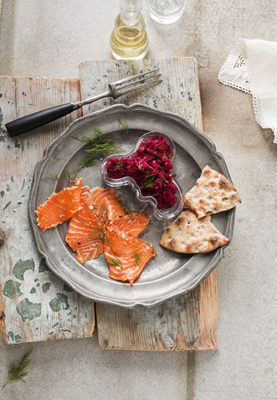
• Skip to primary navigation
  • Skip to content
  • Skip to footer
  • About
  • Press + Awards
  • Featured Books
  • Recipes
  • Exhibitions
  • Speaking
    • Speaking Inquiries
  • Blog
  • Contact

Darra Goldstein

Darra Goldstein is an author and food scholar. She has published 17 books and is a frequent speaker at organizations and events around the world. Books include "Fire + Ice: Classic Nordic Cooking," "A Taste of Russia," and "The Georgian Feast," among others.

Vegetarian

Beet Tartare

Beet Tartare

There’s no typo here! …This ruby beet tartare is a vegetarian take on the classic råbiff introduced to Sweden from France in the nineteenth century. Like many salads, it’s most dazzling in summer, when beets are sweet and garden fresh. Winter beets will yield a darker garnet dish, not quite so brilliant, and you may want to add a little sugar to perk it up. Spread these beets on bread or crackers, plate them with cured fish or meat, or scoop them onto a bed of lettuce. Th…e flavor is beautiful at any time of year.

Recipe from: Fire + Ice: Classic Nordic Cooking

Photograph of Beet Tartare by Stefan Wettainen
Print

Beet Tartare

Yield 2 cups

Ingredients

  • 11⁄2 pounds beets
  • 1 by 1⁄2-inch piece horseradish,
  • peeled and chopped
  • 1 tablespoon cider vinegar
  • 1 small shallot, coarsely chopped
  • 2 tablespoons coarsely chopped
  • dill pickle
  • 1 tablespoon mayonnaise
  • 2 tablespoons minced fresh dill
  • 1⁄4 teaspoon salt
  • Freshly ground pepper to taste

Instructions

  1. Bring a large pot of salted water to a boil. Add the beets and cook until tender, 30 to 45 minutes, depending on their size and age. Drain, peel, and chop coarsely.
  2. In a mini food processor or spice grinder, whir the horseradish with the cider vinegar until it is grated.
  3. Place the beets in the bowl of a food processor. Add the grated horseradish mixture along with the shallot and pickle and process until finely chopped. Be careful not to make a puree— the tartare should be minced, with some texture.
  4. Transfer the beets to a bowl and stir in the mayonnaise, dill, and salt. Season with pepper to taste. Cover and refrigerate for at least 2 hours before serving.
Salt and Ash-Baked Celery Root

Salt and Ash-Baked Celery Root

Rather than succumb to the doldrums of winter, I try to be Nordic and embrace the bitter cold and the dark. And that sometimes means playing with fire!

We have a wood-fired oven in our kitchen, where we bake bread and pizza and like to roast meat and vegetables near the coals. Recently we began looking for culinary ways to use some of the ash, and this New Nordic technique for coating root vegetables has become a favorite.

When you smear celery root with a paste of salt and ash, the interior turns out wonderfully creamy and perfectly seasoned. Lacking a wood-fired oven, you can use ash from a regular fireplace or from a grill, as long as it comes from hardwood.

Recipe from: Fire + Ice: Classic Nordic Cooking

Photograph of Salt and Ash Baked Celery Root by Stefan Wettainen
Print

Salt and Ash-Baked Celery Root

Yield 4 servings

Ingredients

  • 1 small celery root (about
  • 14 ounces)
  • 21⁄2 cups salt
  • 1⁄2 cup fireplace ash
  • 1⁄2 cup water, or as needed
  • 2 tablespoons butter
  • 2 tablespoons chopped fresh
  • parsley

Instructions

  1. Preheat the oven to 350°F. Scrub the celery root. In a small bowl, stir together the salt, ash, and water to make a paste that holds together when you squeeze it with your hand (the amount of water will depend on how dense the ash is).
  2. Spread the paste all over the celery root, pressing down so that it adheres, and place the celery root in an ovenproof dish. Bake until you can easily insert a small knife, about 2 hours.
  3. Just before the celery root comes out of the oven, melt the butter in a small pan over low heat, then stir in the parsley. Set aside.
  4. Remove the celery root from the oven and crack the crust open with a meat mallet. With a small paring knife, peel the charred celery root, then slice it lengthwise and arrange on a platter.
  5. Drizzle the parsleyed butter over the top and serve immediately.
Russian Pancakes (Blini)

Russian Pancakes (Blini)

Now an international favorite, blini are one of the oldest Slavic foods, dating back to the heathen tribes that worshipped the sun and created pancakes in its image. These earliest pancakes were called mliny, from the verb molot’ (“to grind”), and the word is still preserved in the Ukrainian, Serbian and Croatian tongues. Light and porous, blini are designed to soak up lots of butter.

Traditionally, one is expected to gorge on blini. Literary and actual precedents are numerous in Russian life: Gogol’s Chichikov of Dead Souls finishes off nine of the pancakes while visiting the widow Korobochka, dipping them repeatedly in melted butter and gobbling them down three at a time, while the downfall of the nineteenth–century gourmand Lyapin was in the two dozen blini he once consumed before dinner.

To ensure perfect blini, Russian cooks use a special pan. Once seasoned, this pan is never washed, just wiped out with salt. The old-fashioned blini pan was clever indeed: four to six small indented pans were joined by a long central body with a handle, so that mounds of blini could be turned out very quickly. But a good cast-iron frying pan will work just as well. Simply be sure to add more butter to the pan after each blin so that the next one won’t stick. (Russian cooks use an onion half or a raw potato or a stale crust of bread to daub on the butter.)

If, however, the first blin you make turns out badly, don’t despair. The Russians have a saying for this (as for every) eventuality: “Pervyi blin komom” — “The first blin’s a lump.” In other words, if at first you don’t succeed, try, try again. I myself like to consider this first blin the cook’s prerogative and pop it right into my mouth.

Recipe from: A Taste of Russia

Blini (Russian Pancakes)
Print

Russian Pancakes (Blini)

Yield 6 servings

Ingredients

  • 1 package active dry yeast
  • 2 cups milk
  • 1 teaspoon sugar
  • ¾ cup buckwheat flour
  • 2 tablespoons butter
  • 3 eggs, separated
  • ¼ cup sour cream
  • 3/4 teaspoon salt
  • 1½ cups all-purpose flour
  • ½ cup heavy cream

Instructions

Step 1

Dissolve the yeast in ¼ cup of the milk, heated to lukewarm. Then stir in the sugar and 1¼ cups more of the milk. Add the buckwheat flour and stir briskly to mix. There should not be any lumps. Cover the sponge mixture and let rise in a warm place for 1 hour.

Step 2

Melt the butter and mix it with the egg yolks and the sour cream. Add this mixture to the sponge, along with the remaining ½ cup of milk, the salt, and the all-purpose flour. Cover the bowl and let rise in a warm place for 2 hours. (Make sure you have beaten the flour in well; there should not be any lumps.)

Step 3

Beat the cream until stiff. Beat the egg whites until stiff but not dry and fold them into the cream. Fold this mixture into the batter. Then let the batter rest for 30 minutes more (if the batter seems too thick at this point, a little warmed milk may be carefully added).

Step 4

Heat one or several cast-iron pans. Brush with butter (and a little vegetable oil, if desired); when the butter is hot, the pans are ready.

Use 2 tablespoons of the batter for each blin, taking it from the top of the batter each time so that the rest doesn’t fall. Pour it onto the prepared pan and swirl the pan to make a pancake about 5 inches in diameter.

Cook the blin for just a few minutes, until bubbles appear on the surface, then turn and cook the other side until faintly browned. The blini are best served hot from the pan, but if they must be held, pile them in a deep dish, brushing each one with butter, and cover the top of the dish with a linen towel.


Winter Holiday Pilaf

Winter Holiday Pilaf

Uzbeks claim that their national cuisine boasts three hundred different kinds of pilaf, orplov. If so, then I probably won’t live to taste them all—to my regret, since a well-made pilaf is one of the great rice dishes of the world.

But I have feasted on at least one of the best, the fruit­laden pilaf offered here, a gift from Glenn and Asele Mack. Glenn has been studying Central Asian cuisine ever since he met Asele, whose relatives hail from Uzbekistan; he even worked for a time with an Uighur noodle master in Kazakhstan. With its rich assortment of fresh and dried fruits, this pilaf is generally reserved for special occasions. Glenn and Asele were regaled with it in a small Kyrgyz village after a rigorous 15-hour bus ride over the Tian Shan Mountains.

To make this dish accessible to Americans, I’ve taken a few liberties with the ingredients. Normally, scarlet barberries would be used instead of lemon juice to add tartness and color (they’re also prized for their high vitamin content). Uzbek cooks favor yellow carrots, which are somewhat less sweet than the orange. Their local black cumin seed is stronger than ours, and quince are readily available throughout Central Asia. But despite my modifications, this pilaf is a lavish way to regale guests, whether they’ve traveled 15 minutes by highway or 15 hours overland.

From: The Winter Vegetarian 

Vegetarian Pilaf
Print

Winter Holiday Pilaf

Yield 6 servings

Ingredients

  • ½ cup dried chickpeas
  • 1/4 cup light olive oil
  • 1 small white onion, peeled and thinly sliced
  • ½ pound carrots, peeled and julienned
  • 1 small parsnip, peeled and julienned
  • 1 quince, peeled, cored, and cut into 8 wedges (see Notes)
  • 3 cups vegetable broth
  • 2 teaspoons freshly squeezed lemon juice
  • ¼ cup raisins
  • ¼ cup dried apricots, halved
  • 2 whole heads of garlic, unpeeled, ½ inch sliced from the tops
  • 1 ½ teaspoons cumin seed
  • 1 teaspoon ground cumin
  • ½ teaspoon salt
  • Freshly ground black pepper
  • 1/8 teaspoon paprika
  • Pinch of turmeric
  • 1 ¼ cups raw rice
  • ¼ cup finely chopped parsley
  • ¼ cup finely chopped fresh coriander (cilantro)
  • Pomegranate seeds (optional)

Instructions

Step 1

Soak the chickpeas overnight in water to cover. Drain before using.

Heat the oil in a large wok. Add the onion and fry over medium-high heat for 1 to 2 minutes. Stir in the carrots and parsnip and cook, stirring occasionally, for 5 minutes more, until the vegetables are lightly browned. Place the quince, the drained chickpeas, 1 ½ cups of the vegetable broth, the lemon juice, raisins, and apricots on top of the vegetables. Submerge the heads of garlic in the broth in the center of the wok.

Step 2

Bring the mixture to a boil, then stir in the cumin seed, ground cumin, salt, pepper, paprika, and turmeric. Pour the rice over the broth, then add the remaining 1 ½ cups broth. Cover the wok and cook over medium heat for 5 minutes. Remove the cover and stir the rice to coat each grain with broth, taking care not to disturb the fruits and vegetables at the bottom. Replace the cover and cook 10 minutes more. Then, with a chopstick make several holes in the rice to the bottom of the wok. Continue to cook the rice, covered, until it is tender and the liquid has been absorbed, 10 to 15 minutes longer.

Step 3

Remove the garlic and set aside. Stir the pilaf gently to avoid mashing the quince. Transfer to a large platter and scatter the minced parsley, fresh coriander, and pomegranate seeds over the rice. Display the heads of garlic prominently on top and serve.

Notes

I have had success substituting a large Asian pear for the quince. Peel, core, and slice it into eight wedges. If neither quince nor Asian pears is available, try using a large, tart apple.

Pomegranate seeds freeze well. When the fruits are in season in the autumn, save the seeds, wrap them airtight, and store in the freezer for up to 6 months.

The traditional accompaniment to this pilaf is a plate of scallions and shredded radishes. I also like to serve flatbread on the side.

Gingerbread With Hot Orange Sauce

Gingerbread With Hot Orange Sauce

I love gingerbread in all of its forms—crisp snaps, chewy bars, and traditional English cake. This recipe makes a cakelike gingerbread that is extremely moist and tender. When served with hot orange sauce, it is pure bliss.

Recipe from: The Winter Vegetarian 

Gingerbread
Print

Gingerbread With Hot Orange Sauce

Ingredients

Gingerbread

  • 1 egg
  • 6 tbsp. light brown sugar
  • 1/2 cup dark molasses
  • 6 tbsp. unsalted butter, melted
  • 1 tsp. ground ginger
  • 3/4 tsp. ground cinnamon
  • 1/4 tsp. ground cloves
  • 1/4 tsp. grated nutmeg
  • Pinch of salt
  • 1 tsp. baking soda
  • 1/4 tsp. baking powder
  • 1 cup all-purpose flour
  • 1/2 cup boiling water

Hot Orange Sauce

  • 1/2 cup sugar
  • 1/4 cup firmly packed light brown sugar
  • 4 tsp. cornstarch
  • 1/2 cup freshly squeezed orange juice
  • 2 tbsp. freshly squeezed lemon juice
  • 1 tsp. grated orange rind
  • Pinch of salt
  • 2 tbsp. unsalted butter
  • 1 tbsp. light corn syrup
  • 3/4 cup water

Instructions

Gingerbread

Preheat the oven to 350°F. Grease an 8-inch-square pan.

Beat the egg into the brown sugar in a medium bowl. Stir in the molasses, melted butter, and spices, mixing well, then add the salt, baking soda, baking powder, and flour. Beat in the boiling water. The batter will be loose. Pour the batter into the prepared pan and bake for 30 minutes, or until a cake tester inserted in the center comes out dry. Allow to cool before cutting into squares. Serve plain or with hot orange sauce.

Hot orange sauce

Mix the sugars with the cornstarch in a medium saucepan. Gradually add the orange and lemon juices, stirring vigorously to avoid lumps. Stir in the orange rind, salt, butter, corn syrup, and water. Bring to a boil over medium heat and cook until the sauce thickens, 5 to 8 minutes. Serve hot.

Vegetarian Black Bean Chili

Vegetarian Black Bean Chili

Chili doesn’t get much better than this spicy version with black beans. Cooked with tomatoes, the beans take on a beautiful mahogany color. Serve the chili plain or over boiled rice, and sprinkle with grated cheese if you like.

Recipe from: The Winter Vegetarian 

Black Bean Chili
Print

Vegetarian Black Bean Chili

Yield 6-8 Servings

Ingredients

  • 1 pound dried black beans
  • 4 cups water
  • 1 bay leaf
  • 2 medium onions, peeled and chopped
  • 4 large garlic cloves, peeled and minced
  • 1 red bell pepper, cored, seeded, and finely chopped
  • 1 tbsp. vegetable oil
  • One 28-oz. can tomatoes, coarsely chopped, including the juice
  • 2 tbsp. tomato paste
  • 1 tbsp. ground cumin
  • 2 tsp. paprika
  • 1/2 tsp. cayenne
  • 4 tsp. chili powder
  • 1 tsp. dried oregano
  • 1-1/2 tsp. salt
  • Freshly ground black pepper
  • 1 tbsp. dark brown sugar
  • Grated Monterey Jack cheese (optional)

Instructions

Step 1

Soak the beans in water to cover overnight. The next day, drain them and place in a large stockpot with the 4 cups of water. Add the bay leaf and simmer for 25 to 30 minutes, until the beans are tender but still slightly chewy.

Step 2

While the beans are simmering, slowly cook the onions, garlic, and red pepper in the oil for 12 to 15 minutes. Stir into the bean pot. Add the remaining ingredients, except for the grated cheese, and simmer, covered for 1 hour. Serve hot, sprinkled with cheese, if desired.

Cheddar Jalapeño Biscuits

Cheddar Jalapeño Biscuits

Of all the biscuits we made in Baking Boot Camp, these were my favorite. They literally melt in your mouth. If you don’t want to take the time to cut out individual biscuits, you can quickly cut the dough into triangles, like scones.

Recipe from: Baking Boot Camp 

Cheddar Jalapeno Biscuits
Print

Cheddar Jalapeño Biscuits

Yield 12 biscuits

Ingredients

  • 1½ cups bread flour
  • 1¼ cups all-purpose flour
  • 2 teaspoons sugar
  • 2 teaspoons baking powder
  • ¼ teaspoon baking soda
  • 1 teaspoon salt
  • ½ cup (1 stick) cold unsalted butter, cubed
  • 1½ cups grated cheddar cheese
  • ¾ cup whole milk
  • 1 egg, lightly beaten
  • 1 tablespoon jalapeño, minced
  • Egg wash of 1 egg whisked with 1 tablespoon water

Instructions

Step 1

Preheat the oven to 425ºF. In a medium bowl combine the bread flour, all-purpose flour, sugar, baking powder, baking soda, and salt. With a pastry blender, fork, or two knives, cut the butter into the flour until the mixture is the consistency of coarse cornmeal; set aside.

Step 2

In a small bowl, combine the cheese, milk, 1 egg, and jalapeño. Add this cheese mixture to the flour mixture and stir just until the dough starts to pull away from the sides of the bowl. Do not overmix.

Step 3

Scrape the dough from the bowl onto a lightly floured surface and knead lightly 8 to 12 times, gently pressing the dough together as you knead. Roll out or use your fingertips to press down the dough to a 1-inch thickness; using a 2-inch round cutter, cut the dough into biscuits. Gather scraps together, re-roll, and cut additional biscuits.

Step 4

Place the biscuits on an un-greased baking sheet approximately 1 inch apart and lightly brush the tops with the egg wash. Bake until golden brown, 12 to 15 minutes.


Spiced Berry and Pear Crisp

Spiced Berry and Pear Crisp

This autumnal dessert is a nice twist on the more usual apple crisp. Unlike cobblers, which are made with a biscuit topping, crisps have a sweet, crumbly upper layer, made here with a combination of oats and nuts. Crisps are best when served quite warm, though not piping hot. You can bake this dessert in advance, then reheat it gently in a 275ºF oven for 15 minutes. Serve with a dollop of lightly whipped cream or a scoop of vanilla or ginger ice cream.

Recipe from: Baking Boot Camp 

Spiced berry and pear crisp
Print

Spiced Berry and Pear Crisp

Yield 6-8 Servings

Ingredients

  • 3 cups mixed berries
  • 4 medium pears (Bartlett or Comice), peeled, cored, and diced
  • ½ cup packed brown sugar
  • 1 tablespoon freshly squeezed lemon juice
  • 1 teaspoon grated lemon zest
  • ¾ teaspoon ground cinnamon, divided
  • ¼ teaspoon ground nutmeg
  • ¼ teaspoon ginger
  • ½ cup all-purpose flour
  • ½ cup rolled oats
  • ½ cup toasted chopped nuts (almonds, walnuts, or pecans)
  • ½ cup sugar
  • ½ teaspoon salt
  • ¼ cup (½ stick) unsalted butter, diced
  • 1 egg, lightly beaten

Instructions

Step 1

Preheat the oven to 375ºF. Lightly butter a deep 2-quart baking dish or 6 individual gratin dishes.

Step 2

Combine the berries, pears, brown sugar, lemon juice, lemon zest, ¼ teaspoon of the cinnamon, the nutmeg, and ginger in the baking dish. Spread into an even layer.

Step 3

Combine the flour, oats, nuts, sugar, salt, and the remaining ½ teaspoon cinnamon in a food processor. Pulse the machine on and off a few times to combine. Add the diced butter to the oatmeal mixture and process just until the mixture looks crumbly.

Step 4

Spread the oatmeal mixture evenly over the filling and bake in a preheated oven until the top is golden brown and the fruit is tender, about 1 hour.


Footer

  • Facebook
  • Instagram
  • LinkedIn
  • Twitter

About

  • About Darra
  • Press, Awards + Media
  • Curriculum Vitae

Darra’s Work

  • Books
  • Recipes
  • Exhibitions

Events + Contact

  • Speaking
  • Contact

© Copyright 2024 Darra Goldstein · All Rights Reserved · Site by Camille Farey Design · Photo Credits