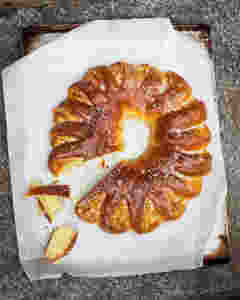
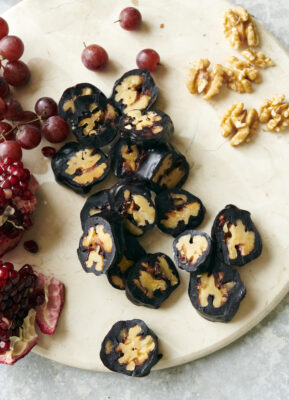
• Skip to primary navigation
  • Skip to content
  • Skip to footer
  • About
  • Press
  • Featured Books
  • Recipes
  • Speaking
    • Speaking Inquiries
    • Upcoming Events
  • Blog
  • Contact

Darra Goldstein

Darra Goldstein is an author and food scholar. She has published 17 books and is a frequent speaker at organizations and events around the world. Books include "Fire + Ice: Classic Nordic Cooking," "A Taste of Russia," and "The Georgian Feast," among others.

Dessert

Sour Cream Honey Cake (Сметанник)

Sour Cream Honey Cake (Сметанник)

Print

Sour cream and honey, two of Russia’s most iconic foods, are lusciously paired in this honey cake, with billows of sour cream complementing the cake’s chewy texture. The recipe is courtesy of Svetlana Kozeiko, the brilliantly inventive chef of Murmansk’s restaurant Tsarskaya Okhota (The Royal Hunt). This cake is ideal for entertaining, since it has to be chilled before slicing. I usually make it the morning of a dinner party and refrigerate it all day. The longer you hold the cake, the softer it becomes, so leftovers make an indulgent breakfast. To whip the frosting into luxuriant clouds you’ll need to seek out high-fat sour cream (see Sources).

Recipe from Beyond The North Wind.

Ingredients

  • 4 tablespoons unsalted butter
  • 3 tablespoons honey
  • 1 teaspoon baking soda
  • 1 medium egg
  • ½ cup sugar
  • 1¾ cups all-purpose flour
  • 12 ounces (1½ cups) high-fat sour cream
  • 2/3 cup confectioners’ sugar

Instructions

In a small saucepan heat the butter and honey over low heat until the butter melts. Stir in the baking soda. The mixture will almost immediately bubble up, foam, and turn light in color. Don’t be alarmed by the smell of sodium bicarbonate that’s released—you won’t taste it. Remove the pan from the heat and leave the mixture to cool for about 15 minutes.

Meanwhile, crack the egg into a medium bowl and whisk it by hand with the sugar for a few minutes, until light. Stir in the cooled butter mixture, then sift the flour directly into the bowl, stirring to make a very soft dough. Cover the bowl with plastic wrap and leave to rest for 20 minutes. The dough will firm up and become nicely pliable.

While the dough is resting, prepare the sour cream filling. Beat the sour cream and confectioners’ sugar in a heavy-duty mixer on high speed for 5 minutes, until stiff peaks form. Place in the refrigerator to chill, preferably for 1 hour.

When the dough has finished resting, preheat the oven to 350ºF. Line a 12” x 17” baking sheet with parchment paper. Divide the dough into 4 pieces (each will weigh just under 4 ounces). Rinse your hands quickly with cold water and pat each piece out on the parchment into 5 ”x 5” squares about 1/8-inch thick. Bake the squares at 350ºF for 8 to 10 minutes, until slightly puffed and golden. Place the baking pan on a rack to cool. If you don’t plan to assemble the cake right away, store the cooled squares airtight so they don’t dry out.

When you’re ready to assemble the cake, place one cake square on a serving plate and spread it with one-quarter of the sour cream. Top with another cake square, and continue to layer the cake and sour cream, ending with sour cream on top. Make decorative swirls with the sour cream but don’t frost the sides of the cake.

Carefully transfer the cake to the refrigerator. If the sour cream is still soft and the layers should slide a bit as you move the cake, simply nudge them upright again. Chill the cake in the refrigerator for at least 4 hours to firm up before slicing.

Serves 8.

Note: If you can’t find high-fat sour cream, use half full-fat sour cream and half heavy (whipping) cream.

Strawberry Meringue Cake (Mansikkakakku)

Strawberry Meringue Cake (Mansikkakakku)

This cake is, quite simply, a showstopper. With mounds of fresh strawberries layered between billows of whipped cream and disks of slightly chew almond meringue, it tastes as fabulous as it looks.

Recipe from: Fire + Ice: Classic Nordic Cooking

Print

Strawberry Meringue Cake (Mansikkakaku)

Yield 6 servings

Ingredients

  • 1 cup blanched almonds
  • 1½ cups + 2 tablespoons sugar, divided
  • 6 egg whites
  • Pinch of salt
  • 1½ cups heavy cream
  • ¼ teaspoon pure vanilla extract
  • 2 cups strawberries, sliced

Instructions

Preheat the oven to 350ºF. Place the almonds on a baking sheet and toast until just golden, 6 to 8 minutes. Lower the heat to 250ºF.

Transfer the almonds to the bowl of a food processor. Add ½ cup of the sugar and pulse until the almonds are finely ground.

Place the egg whites in the bowl of a stand mixer and beat on high speed until foamy. Add the salt and gradually beat in 1 cup of the sugar until stiff peaks form. Continue beating on the highest speed until you have a stiff, shiny meringue for about 3 minutes. Gently fold in the almond mixture.

Line a large baking sheet with parchment paper. With a spatula, carefully spread the meringue into two 8-inch rounds, smoothing the tops. Bake until pale gold, about 1 hour. Then turn off the heat and prop the oven door ajar with the handle of a wooden spoon. Let the meringues dry in the oven for 2 hours more, until no longer sticky to the touch.

When the meringue layers are ready, whip the cream with the remaining 2 tablespoons of sugar and the vanilla until stiff but not dry. Carefully transfer one meringue layer to a cake plate. Spread ½ cup of the whipped cream over the layer and top the cream with half of the strawberries. Cover the strawberries with another ½ cup of the whipped cream. Place the second meringue layer on top of the filling. Decoratively pipe the remaining ½ cup whipped cream around the edge of the meringue layer, and fill the center with the remaining sliced strawberries.

Place the cake in the refrigerator to chill for 1 hour before serving to allow the flavors to meld. It can be held up to 4 hours before it begins to weep. Let it stand at room temperature for 15 minutes before serving.


Poached Quince with Walnuts (Komshi nigvzit)

Poached Quince with Walnuts (Komshi nigvzit)

Walnuts and quince are a match made in heaven, and this dessert will bring raves from your guests. Because it’s so rich and sweet, I save it for the highlight of a meal rather than serving it after a heavy entrée. I prefer the quince with an ever-so-slightly-restrained three-quarters cup of sugar, but others embrace the full amount. Either way, this is a dish to remember.

Recipe from: The Georgian Feast

Poached Quince with Walnuts recipe by Darra Goldstein
Print

Poached Quince with Walnuts (Komshi nigvzit)

Yield 6 servings

Ingredients

  • 6 quince
  • ½ pound walnuts
  • ¾ to 1 cup sugar
  • ½ cup heavy cream
  • 2 tablespoons currants
  • 2 tablespoons unsalted butter, softened
  • 2½ cups water

Instructions

  1. Cut a 1-inch slice off the top of each quince and set aside. Core the quince and remove all the seeds, carving out a hollow about 1¼ inches in diameter in each one.
  2. In a food processor grind the walnuts finely with the sugar. They should be fairly finely ground, but avoid making a paste. Don’t worry if a few small pieces of walnut remain—they’ll add some nice texture.
  3. Transfer the nut mixture to a bowl and stir in the heavy cream and currants. You’ll have about 2 cups of this mixture. Fill the hollows of each quince with about 1 tablespoon of the filling, reserving the rest.
  4. Replace the lids on the quince and place the fruits in a 4-quart, wide-bottomed saucepan just large enough to hold them in a single layer. Add enough water to come just below the lid lines. Cover the pan and bring the water to a boil, then reduce the heat and simmer the quince for 45 to 50 minutes, until they are soft.
  5. With a slotted spoon carefully lift the quince from the pan and set in a wide, shallow serving bowl. Measure out ½ cup of the quince water and whisk it into the reserved nut mixture, along with the butter. Pour the sauce around the quince and serve warm.

Notes

The quince can be made early in the day and finished for evening dessert. Poach as directed above. Lift the cooked fruit from the pan with a slotted spoon and transfer to a plate. Reserve ½ cup of the cooking water to make the walnut sauce; discard the rest. Return the quince to the pan and let them sit, covered, at room temperature.

About 15 minutes before you’re ready to serve dessert, whisk the reserved cooking water into the walnut-sugar-cream mixture, along with the butter. Pour the sauce around the quince and bring to a simmer. Simmer gently for 10 minutes to reheat. Transfer the quince and the sauce to a serving bowl.

Swedish Almond Wreath (Mandelkrans)

Swedish Almond Wreath (Mandelkrans)

Thankfully, the art of baking is alive and well in Scandinavia, where coffee breaks are a cherished part of the day. I’m especially fond of the sweetened yeast breads made throughout Finland, Sweden, Denmark and Norway, in all sorts of intricate shapes.

The truth is, anything with almond paste makes me swoon, and this beautiful wreath is a particular favorite. During our penurious year in Stockholm we had two weekly indulgences: a visit to Tommy, our friend the fishmonger, and a pastry at Vete-Katten, a warren of small rooms where coffee was served in Royal Copenhagen china and most of the patrons (it seemed to us) were ladies of a certain age, all perfectly dressed and coiffed.

This Konditori is now less formal, and the plates more pedestrian, but the pastries and breads remain spectacular. It’s hard to decide which I like best: kanelbullar (soft cinnamon buns); semlor (tender cardamom buns filled with marzipan and whipped cream); the lavish prinsesstårta (sponge cake layered with pastry cream, raspberry jam, and whipped cream mounded into a dome and draped with pale green marzipan); or this delightful almond wreath.

Like all sweet breads, mandelkrans tastes best when very fresh, but you can reheat it gently to serve the next day.

Recipe from: Fire + Ice: Classic Nordic Cooking

Photograph of a Swedish Almond Wreath by Stefan Wettainen
Print

Swedish Almond Wreath (Mandelkrans)

Ingredients

Wreath

  • 1 package active dry yeast (2¼ teaspoons)
  • ¼ cup lukewarm water
  • 4 tablespoons granulated sugar, divided
  • ¾ cup whole milk, lukewarm
  • 1 egg, at room temperature
  • 6 tablespoons unsalted butter, softened and separated into lumps
  • ¼ teaspoon salt
  • 3 to 3½ cups all-purpose flour

Filling

  • ½ cup blanched almonds
  • 3 tablespoons granulated sugar
  • 3 tablespoons unsalted butter, softened
  • ⅛ teaspoon natural almond extract

Glaze

  • 1 cup confectioner’s sugar
  • 2 tablespoons freshly squeezed orange juice
  • Pearl sugar

Instructions

  1. In a large bowl proof the yeast and 1 Tablespoon of the sugar in the lukewarm water for 5 minutes, until bubbles appear. Stir in the remaining 3 Tablespoons sugar, the lukewarm milk, egg, butter and salt. Add the flour, mixing well to make a soft dough.
  2. Turn the dough out onto a floured surface and knead until it springs back to the touch, 8 to 10 minutes, adding up to ½ cup more flour if necessary. Or knead with the dough hook of a mixer at slow speed for 5 minutes.
  3. Shape the dough into a ball and transfer it to a clean, lightly greased bowl, turning it to grease the top. Leave it to rise, covered, in a warm place until doubled in bulk, about 1½ hours. Punch the dough down and turn it out onto a lightly floured surface. Let sit while you prepare the filling.
  4. In a food processor grind together the almonds and the sugar until the nuts are very finely ground. Transfer to a bowl and mix in the softened butter to form a mass. Stir in the almond extract.
  5. Roll the dough out to a 12 x 18” rectangle. With a small spatula spread the almond paste evenly over the entire rectangle. Starting at the long end, roll the dough up jellyroll fashion into a log. Transfer it to a parchment-lined baking sheet and set it seam-side down. Bring the ends together to form a ring, sealing them tightly.
  6. With scissors, snip the dough ⅔ of the way through to the center of the ring at 1-inch intervals. Gently turn each cut section on its side. Leave the loaf to rise, uncovered, until almost doubled, about 45 minutes.
  7. Preheat the oven to 375°F. Bake the bread for 20 to 25 minutes, until golden. While it is baking, prepare the glaze by mixing together the confectioner’s sugar and orange juice.
  8. While the loaf is still warm spoon the glaze over the loaf. Sprinkle with pearl sugar. Transfer carefully to a rack to cool.
Gingerbread With Hot Orange Sauce

Gingerbread With Hot Orange Sauce

I love gingerbread in all of its forms—crisp snaps, chewy bars, and traditional English cake. This recipe makes a cakelike gingerbread that is extremely moist and tender. When served with hot orange sauce, it is pure bliss.

Recipe from: The Winter Vegetarian 

Gingerbread
Print

Gingerbread With Hot Orange Sauce

Ingredients

Gingerbread

  • 1 egg
  • 6 tbsp. light brown sugar
  • 1/2 cup dark molasses
  • 6 tbsp. unsalted butter, melted
  • 1 tsp. ground ginger
  • 3/4 tsp. ground cinnamon
  • 1/4 tsp. ground cloves
  • 1/4 tsp. grated nutmeg
  • Pinch of salt
  • 1 tsp. baking soda
  • 1/4 tsp. baking powder
  • 1 cup all-purpose flour
  • 1/2 cup boiling water

Hot Orange Sauce

  • 1/2 cup sugar
  • 1/4 cup firmly packed light brown sugar
  • 4 tsp. cornstarch
  • 1/2 cup freshly squeezed orange juice
  • 2 tbsp. freshly squeezed lemon juice
  • 1 tsp. grated orange rind
  • Pinch of salt
  • 2 tbsp. unsalted butter
  • 1 tbsp. light corn syrup
  • 3/4 cup water

Instructions

Gingerbread

Preheat the oven to 350°F. Grease an 8-inch-square pan.

Beat the egg into the brown sugar in a medium bowl. Stir in the molasses, melted butter, and spices, mixing well, then add the salt, baking soda, baking powder, and flour. Beat in the boiling water. The batter will be loose. Pour the batter into the prepared pan and bake for 30 minutes, or until a cake tester inserted in the center comes out dry. Allow to cool before cutting into squares. Serve plain or with hot orange sauce.

Hot orange sauce

Mix the sugars with the cornstarch in a medium saucepan. Gradually add the orange and lemon juices, stirring vigorously to avoid lumps. Stir in the orange rind, salt, butter, corn syrup, and water. Bring to a boil over medium heat and cook until the sauce thickens, 5 to 8 minutes. Serve hot.

Maria Nikolaevna’s Paskha

Maria Nikolaevna’s Paskha

This recipe for the traditional Easter cheesecake was given to me by a Russian émigré of the first wave who settled in San Francisco after the Russian Revolution. This unboiled version of paskha is lighter than those made with sour cream and cooked.

Recipe from: A Taste of Russia

Pashka

1 vote

Print

Maria Nikolaevna’s Paskha

Ingredients

  • 2-1/2 cups sugar (preferably vanilla sugar)
  • 5 large egg yolks
  • 1 lb. unsalted butter, softened
  • 3 lbs. Russian cottage cheese (tvorog) or farmer cheese
  • 1 whole vanilla bean
  • 1 pt. heavy cream

Instructions

Step 1

Beat the sugar and egg yolks together until light and thick. In a separate bowl, cream the butter until smooth, then add the beaten sugar and egg yolks, mixing well.

Step 2

Press the tvorog through a fine sieve, then mix it in well with the butter mixture, beating until the mixture is completely smooth. Slit the vanilla bean lengthwise and scrape the seeds out into the cheese mixture. Stir in the cream.

Step 3

Line a 3-quart paskha mold or large clay flowerpot with cheesecloth. Pour the cheese mixture into the mold, folding the cheesecloth over the top. Set the mold in a bowl in the refrigerator. Place a saucer on top of the mold, and set several heavy cans on it to weight the cheese mixture down and force the liquid out through the drainage hole in the bottom of the mold or flowerpot.

Step 4

Let the paskha drip overnight in the refrigerator, until all excess liquid has drained out. Unmold.

Step 5

Decorate the sides of the paskha with the letters XB in currants or nuts. Serve chilled.


Spiced Berry and Pear Crisp

Spiced Berry and Pear Crisp

This autumnal dessert is a nice twist on the more usual apple crisp. Unlike cobblers, which are made with a biscuit topping, crisps have a sweet, crumbly upper layer, made here with a combination of oats and nuts. Crisps are best when served quite warm, though not piping hot. You can bake this dessert in advance, then reheat it gently in a 275ºF oven for 15 minutes. Serve with a dollop of lightly whipped cream or a scoop of vanilla or ginger ice cream.

Recipe from: Baking Boot Camp 

Spiced berry and pear crisp
Print

Spiced Berry and Pear Crisp

Yield 6-8 Servings

Ingredients

  • 3 cups mixed berries
  • 4 medium pears (Bartlett or Comice), peeled, cored, and diced
  • ½ cup packed brown sugar
  • 1 tablespoon freshly squeezed lemon juice
  • 1 teaspoon grated lemon zest
  • ¾ teaspoon ground cinnamon, divided
  • ¼ teaspoon ground nutmeg
  • ¼ teaspoon ginger
  • ½ cup all-purpose flour
  • ½ cup rolled oats
  • ½ cup toasted chopped nuts (almonds, walnuts, or pecans)
  • ½ cup sugar
  • ½ teaspoon salt
  • ¼ cup (½ stick) unsalted butter, diced
  • 1 egg, lightly beaten

Instructions

Step 1

Preheat the oven to 375ºF. Lightly butter a deep 2-quart baking dish or 6 individual gratin dishes.

Step 2

Combine the berries, pears, brown sugar, lemon juice, lemon zest, ¼ teaspoon of the cinnamon, the nutmeg, and ginger in the baking dish. Spread into an even layer.

Step 3

Combine the flour, oats, nuts, sugar, salt, and the remaining ½ teaspoon cinnamon in a food processor. Pulse the machine on and off a few times to combine. Add the diced butter to the oatmeal mixture and process just until the mixture looks crumbly.

Step 4

Spread the oatmeal mixture evenly over the filling and bake in a preheated oven until the top is golden brown and the fruit is tender, about 1 hour.


Footer

  • Facebook
  • Instagram
  • LinkedIn
  • Twitter

About

  • About Darra
  • Press, Awards + Media
  • Bibliography

Darra’s Work

  • Books
  • Recipes
  • Exhibitions

Events + Contact

  • Speaking
  • Events
  • Contact

© Copyright 2018 Darra Goldstein · All Rights Reserved · Site by Camille Farey Design · Photo Credits